Featured image of post How to Use Biblatex in VScode?

How to Use Biblatex in VScode?

One Possible Elegant way to use Biber in LaTeX.

Biber is a bibliography information processing program that works in conjunction with the LaTeX package BibLaTeX and offers full Unicode support.1

本文使用 Windows,以及 LaTeX-Workshop 扩展。

Background

我们在使用 LaTeX 编辑带有参考文献的文档时,通常会用到 bib 的相关功能;LaTeX 中最为基础的参考文献管理工具 (Reference Management Software) 是诞生于 1985 年的 BibTeX;在它诞生后,也有很多重制版本发布,诸如 CL-BibTeXMLBibTeX 等等;而目前较为常用的 Biber 也在其列。和 BibTeX 相比,Biber 提供了非常多的新增功能,并能够对 Unicode 进行完全支持

How does Biber work?

在使用 Biber 时,我们通常会看到诸如 .aux 文件、.bst 文件、.bib 文件等等,下面简单介绍一下这些文件是怎么来的,以及 Biber 如何利用这些文件进行工作。

  • .aux 文件:由 LaTeX 在(第一次)编译中自动生成;
  • .bst 文件:style 文件 (可选),指定某种形式的参考文献排版方式 (例如一些期刊在投稿时的排版风格要求)
  • .bib 文件:用户自己提供,作为所有参考文献的数据库。

在运行时,Biber 会从 .aux 文件中得知用户希望引用的文献 entry(文档中用 \cite 命令标出的部分),随后到 .bib 文件中找到这些 entries。同时,.bst 文件中定义的样式也会被一同编入一个新的 .bbl 文件,最后由 LaTeX 编译进整个文档。

How to prepare for a .bib file?

一般情况下,在诸如 Google Scholar 等网站上搜集论文的时候,在条目下方会有一个双引号图表的 “cite” 按钮,点击它就可以直接获取当前文献的 entry;
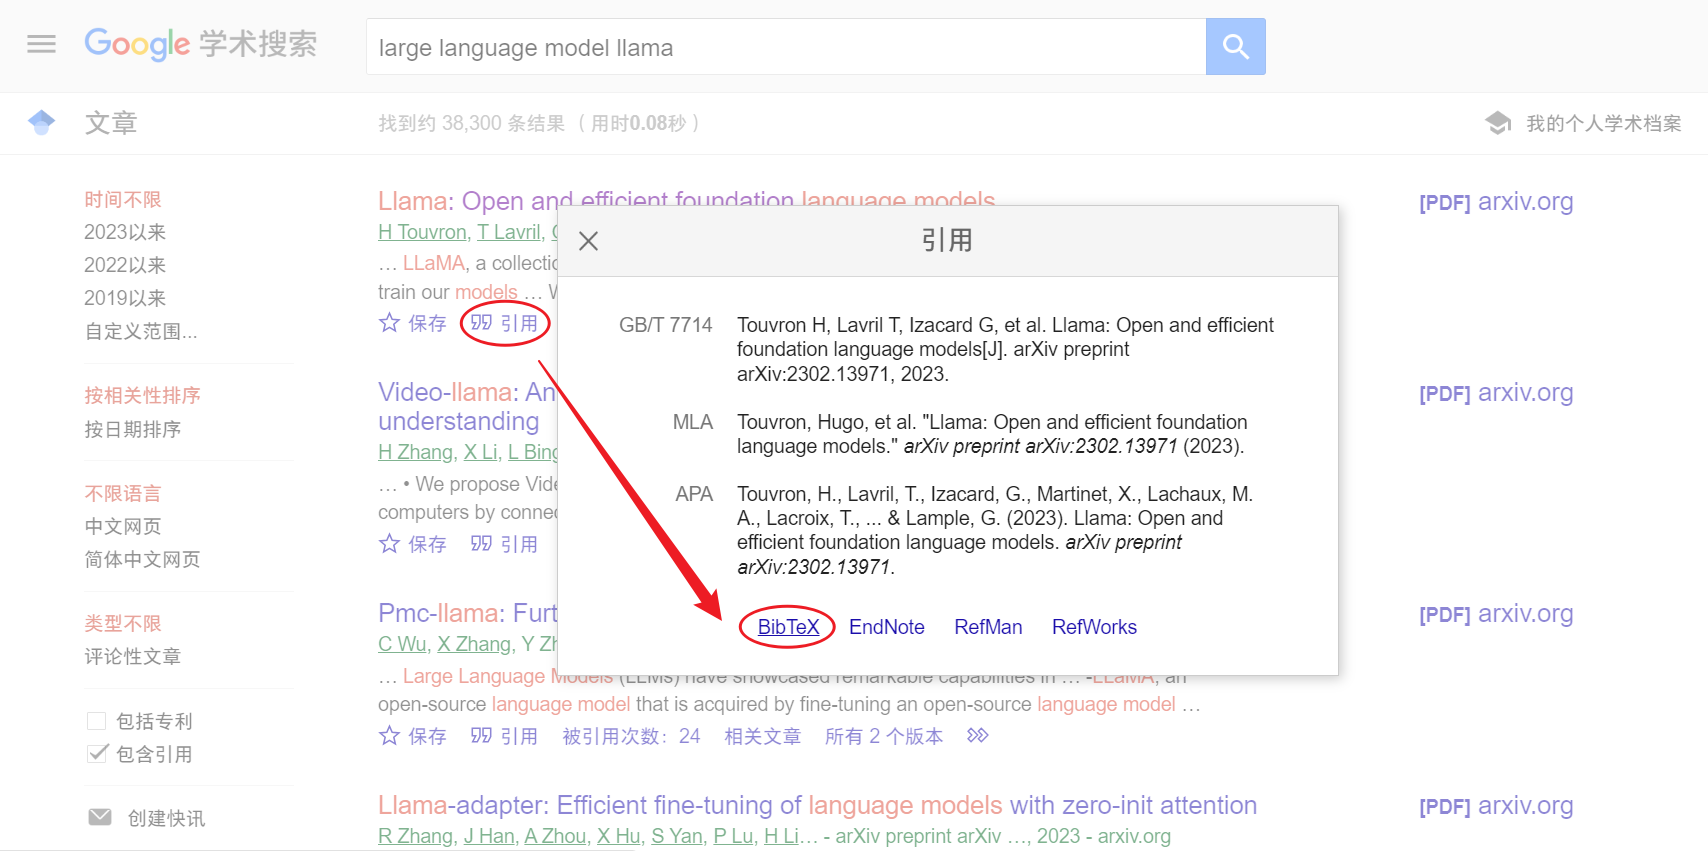
Google Scholar Screenshot

这里用今年比较热点关注的大语言模型 LLaMA 为例,在按照上述方法操作后,得到了相应格式的文件内容如下:

1
2
3
4
5
6
7
8
@misc{touvron2023llama,
      title={LLaMA: Open and Efficient Foundation Language Models}, 
      author={Hugo Touvron and Thibaut Lavril and Gautier Izacard and Xavier Martinet and Marie-Anne Lachaux and Timothée Lacroix and Baptiste Rozière and Naman Goyal and Eric Hambro and Faisal Azhar and Aurelien Rodriguez and Armand Joulin and Edouard Grave and Guillaume Lample},
      year={2023},
      eprint={2302.13971},
      archivePrefix={arXiv},
      primaryClass={cs.CL}
}

不同 entry 的种类 (又称 entry types,例子中为 misc) 和关键字的种类 (又称 field types,例子中如 titleauthor 等等) 各有不同,比较复杂,倒也不必过多关注;如果有兴趣了解,可以移步 entry typesfield types 自行学习。

在按照上述办法获得想要的 bib 格式后,新建一个 .bib 文件,将这些条目依次粘贴进文件中就可以了。

Usage

说了很多 (略带扩展性的) 东西,下面我们来聊一聊如何用 VScode 优雅地使用 Biber 编译文档。介于这篇文档写于笔者暂时没用过 Mac 的时期,以下的一些方案可能只适用于 Windows,如果您在使用 Mac,可以根据下面的配置方法自行研究,或者笔者买完 Mac 后会更新可能存在的区别之处。

首先,Biber 默认和 TeXLive 一同安装。在终端中输入 biber -v,如果正确安装,应当可以看到如下内容:biber version: 2.19 (或者其他版本号)。

打开 VScode 的 settings.json 文件,我们需要编辑的设置包括 latex-workshop.latex.toolslatex-workshop.latex.recipes。这两个设置项的具体含义可以参考扩展的官方文档,笔者的理解是,tools 设置是为一些必要的命令行选项起别名,recipe 设置是将 tools 通过别名方便地排列或者组合。

Method 01:Compilation Chain

一般情况下,最为常用的编译方式为 XeLaTeXpdfLaTeX,分别对应中文文档和英文文档的情形。在 tools 设置中,必要的配置如下所示:

 1
 2
 3
 4
 5
 6
 7
 8
 9
10
11
12
13
14
15
16
17
18
19
20
21
22
23
24
25
26
27
28
29
"latex-workshop.latex.tools": [
  {
    "name": "xelatex",
    "command": "xelatex",
    "args": [
      "-synctex=1",
      "-interaction=nonstopmode",
      "-file-line-error",
      "%DOCFILE%"
    ]
  },
  {
    "name": "pdflatex",
    "command": "pdflatex",
    "args": [
      "-synctex=1",
      "-interaction=nonstopmode",
      "-file-line-error",
      "%DOCFILE%"
    ]
  },
  {
    "name": "biber",
    "command": "biber",
    "args": [
        "%DOCFILE"
    ]
  }
]

如果想弄明白为啥这些参数是这样指定的,以及 %DOCFILE% 到底指什么,还是建议去读扩展的官方文档;为了侧重实用性和简洁性,这里不多赘述。

recipes 的配置如下所示:

 1
 2
 3
 4
 5
 6
 7
 8
 9
10
11
"latex-workshop.latex.recipes": [
  {
    "name": "xelatex -> biber -> xelatex*2",
    "tools": [
      "xelatex",
      "biber",
      "xelatex",
      "xelatex"
    ]
  },
]

和只使用 XeLaTeXpdfLaTeX 进行编译的方式有所区别,如果使用了 Biber,需要经过 latex -> biber -> latex -> latex 的编译链,才能得到全部编译完成的 PDF。多次编译的主要原因是保证交叉引用的正确性;具体原因参见 LaTeX 问答,写的比较详细了。

Method 02:Compilation Once

通过编译链多次编译,可以对 Biber 的行为进行详细控制;不过编译链涉及到对编译器的很多次调用,对于一些较长的文档来说,编译速度可能非常迟缓:十几页的文档可能需要 20 秒到半分钟的编译时长。这时就可以考虑使用 LaTeXmk 工具;这份文档比较简要清楚,需要详细文档可以查看官方文档。它的优点在于全自动化增量编译——如果你只是简单修改了文档或者完全没有修改文档,那么使用 LaTeXmk 工具进行编译将会节省你非常多的时间。

接下来分享一下 LaTeXmk 在 VScode 上的配置方法;这里引用了这篇文章

 1
 2
 3
 4
 5
 6
 7
 8
 9
10
11
12
13
14
"latex-workshop.latex.tools": [
  {
    "name": "XeLaTeXmk",
    "command": "latexmk",
    "args": [
        "-xelatex",
        "-synctex=1",
        "-shell-escape",
        "-interaction=nonstopmode",
        "-file-line-error",
        "%DOC%"
    ]
  },
]

以及 recipes 的配置:

1
2
3
4
5
6
7
8
"latex-workshop.latex.recipes": [
  {
    "name": "latexmk-xe",
    "tools": [
       "XeLaTeXmk"
    ]
  },
]

完成这些步骤之后,就可以在 VScode 中用 Biber 在文档中插入参考文献了!

Example

配置完编译方式,回到 tex 文档本身的问题上来。使用 Biber 需要导入 biblatex 包;同时推荐导入 hyperref,方便实现引用正反向跳转、链接上色等进阶功能。

基本代码如下:

 1
 2
 3
 4
 5
 6
 7
 8
 9
10
11
12
13
14
15
16
\documentclass[a4paper]{article}
\usepackage[margin=25mm]{geometry}
\usepackage{newtxtext,newtxmath}
\usepackage[style=numeric,backref=true,doi=false,isbn=false,url=false,eprint=false,sorting=ynt]{biblatex}

\title{VScode Example for Bib\LaTeX}
\author{Zacha VIXX}
\addbibresource{exp.bib}

\begin{document}
\maketitle
Currently, large language models (such as ChatGPT~\cite{chatgpt})
are attracting increasingly attention for both developers and researchers.

\printbibliography{}
\end{document}

其中,exp.bib 是包含了若干文献 entries 的文件,如下所示:

 1
 2
 3
 4
 5
 6
 7
 8
 9
10
11
12
13
14
15
@misc{vicuna2023,
    title = {Vicuna: An Open-Source Chatbot Impressing GPT-4 with 90\%* ChatGPT Quality},
    url = {https://lmsys.org/blog/2023-03-30-vicuna/},
    author = {Chiang, Wei-Lin and Li, Zhuohan and Lin, Zi and Sheng, Ying and Wu, Zhanghao and Zhang, Hao and Zheng, Lianmin and Zhuang, Siyuan and Zhuang, Yonghao and Gonzalez, Joseph E. and Stoica, Ion and Xing, Eric P.},
    month = {3},
    year = {2023}
}
@misc{chatgpt,
  author = {{OpenAI}},
  title = {{ChatGPT}},
  howpublished = {[Online]},
  year = {2022},
  note = {Available at: \url{https://openai.com/blog/chatgpt/}},
  urldate = {2022-11-30},
}

这里其实关注到的是 biblatex 在导入包的过程中指定了很多选项;

  • style=numeric 是默认选项,也即将参考文献按某种顺序 (sorting 选项的作用) 排序,然后用数字来标号;除此以外也有使用 alphabetic 字母+数字的,不过不是很常见。
  • backref=true 选项说明我需要在文末参考文献上附上反向链接定位到引用处;
  • 其他若干 false 选项说明不要在参考文献中保留这些信息,使用时可自行决定。

最终得到的编译结果大致如下所示:
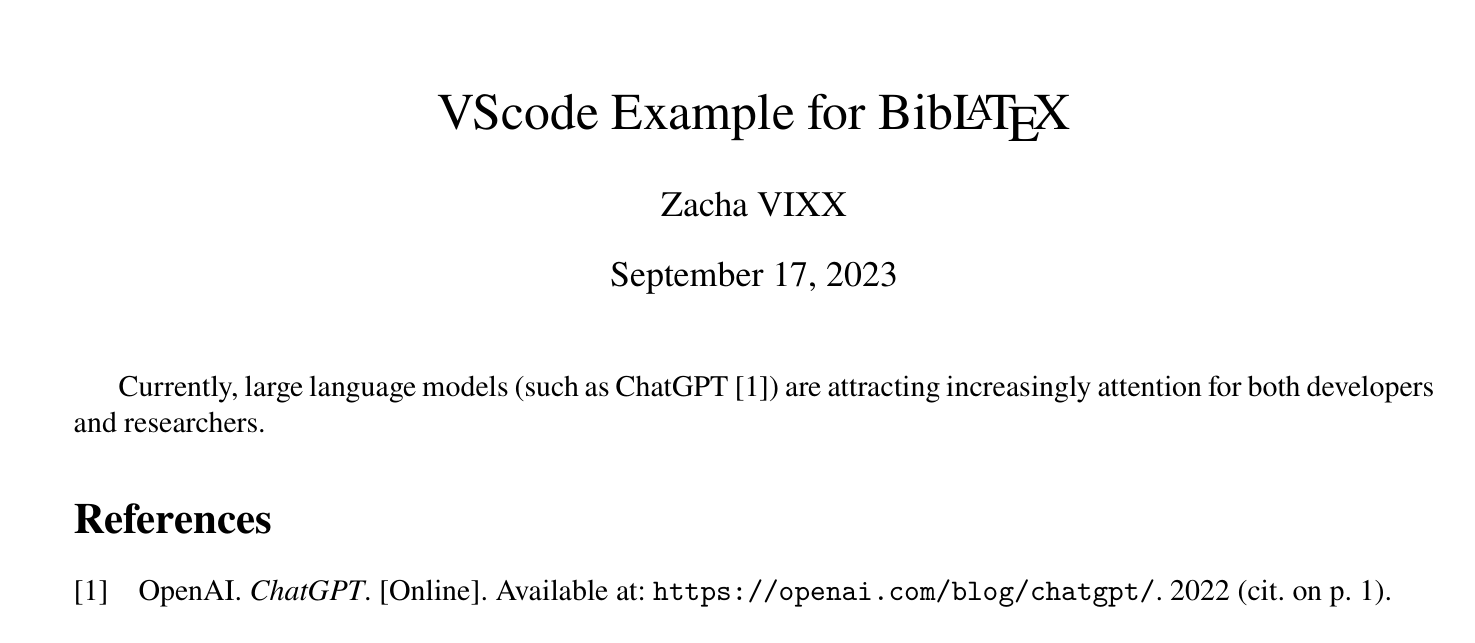
First Edition

这时候,不论是正向链接还是反向链接都是可以点击的;那我们如何给这些链接加上颜色呢?这就需要使用 hyperref 包;在导言区加入 \usepackage{hyperref}\usepackage{xcolor} (一个颜色 package);随后通过 hypersetup 命令设置颜色。(可能因为在 THU 呆久了的缘故,我特别喜欢用 violet 😴) 至于各个选项究竟特指什么链接,可以自行调查 👀

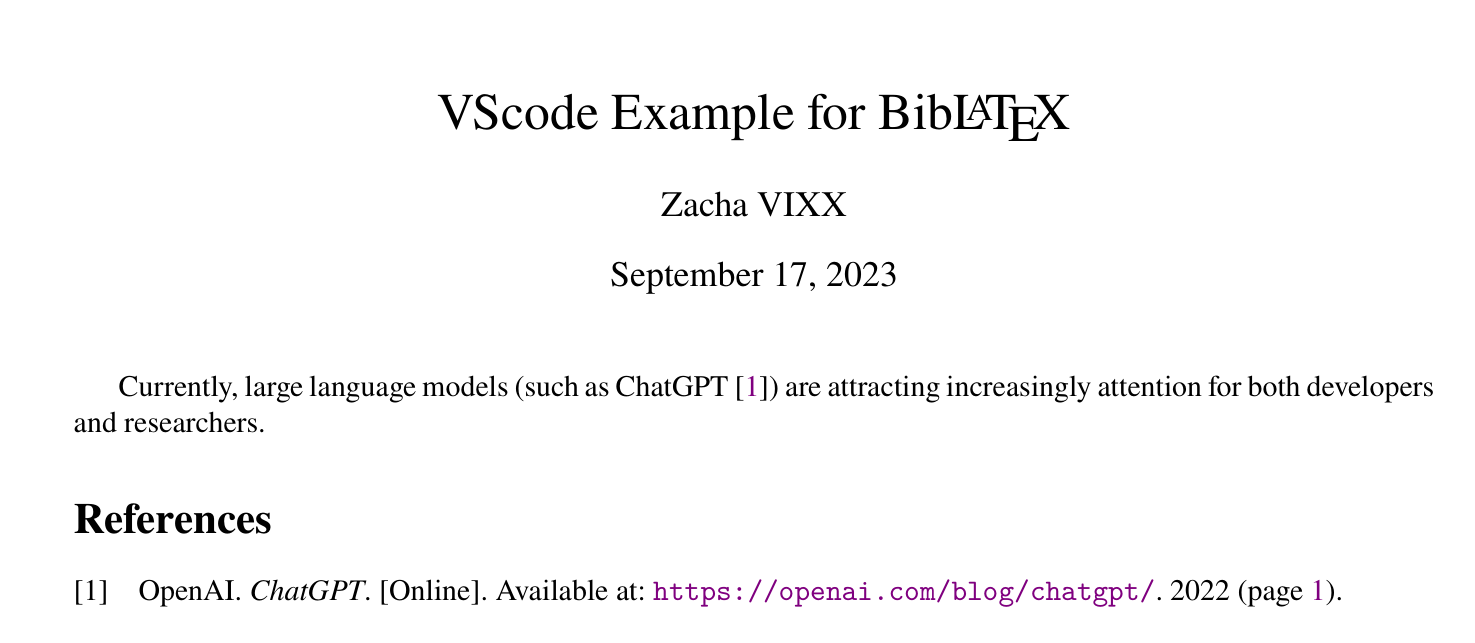
此外,你可能注意到了反向定位中 (cit. on p. 1). 这个默认样式,如果你想更改也是没有问题的,这里引用了 Stack Overflow 上的这篇回答

 1
 2
 3
 4
 5
 6
 7
 8
 9
10
11
12
\hypersetup{
    colorlinks=true,
    linkcolor=violet,
    filecolor=violet,      
    urlcolor=violet,
    citecolor=violet,
}

\DefineBibliographyStrings{english}{
  backrefpage = {page},
  backrefpages = {pages},
}

看看最后的效果👏

Final Edition


  1. from Wikipedia: Biber (LaTeX) ↩︎

👋Welcome to Zacha's Story Soup😴
Built with Hugo
Theme Stack designed by Jimmy